How to clean my Philips HomeRun vacuum cleaner robot?
Published on 10 July 2026
To keep your Philips HomeRun vacuum and mop robot in good condition, read the article below about cleaning and maintaining the robot.
To maintain your 7000 series robot:
The information below applies to the 7000 series models.
- Empty the dust bin after every cleaning session (only for XU7000)
- Clean the washable mop pad
- Clean the main brush
- Clean the side brush
- Clean the charging contacts and sensors
- Replace the dust bag (only applicable for the XU7100). Note: Watch the video in section "Auto-Empty Station".
- Clean the washable air filter
Play Pause
To maintain your 3000 series robot:
The information below applies to the 3000 series models.
Depending on the model, watch our video on how to maintain your robot below.
- Empty the dust bin after every cleaning session (only for XU3000)
- Clean the washable air filter
- Clean the washable mop pad
- Clean and fill the water tank
- Clean the main brush
- Clean the side brush
- Clean the charging contacts and sensors
- Replace the dust bag (only applicable for the XU3100and XU3110). Note: Watch the video in section "Auto-Empty Station".
Depending on the model, watch our video on how to maintain your robot below.
Play Pause
To maintain your 2000 series robot:
The information below applies to the 2000 series models.
- Empty the dust bin after every cleaning session (only for XU2000)
- Clean the washable air filter
- Clean the washable mop pad
- Clean and fill the water tank
- Clean the main brush
- Clean the side brush
- Clean the charging contacts and sensors
- Replace the dust bag (only applicable for the XU2100). Note: Watch the video below.


To maintain your 6000 series robot:
The information below applies to the 6000 series models.
Dustbin maintenance
Dustbin maintenance
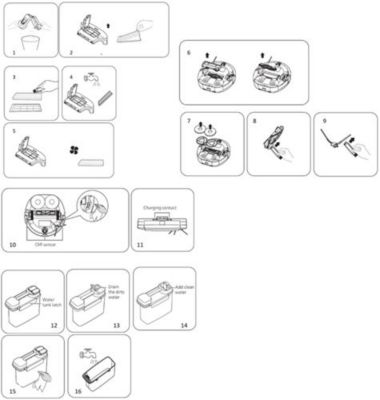
- Open and empty the dustbin (Image 1).
- Remove the filter (Image 2).
- Remove the dust inside the filter and dust bin with a bird brush (Image 3).
- Use clean water to rinse the dust bin and filter, and then shake off the water droplets on the dust bin and filter (Image 4). Note: After cleaning, leave the dust bin and filter to dry thoroughly (Image 5). Do not use hot water or detergents.
- First, detach the mop assembly and separate the mop from it.
- Use clean water to rinse the mop assembly. Be careful not to scrub too hard, as this could cause damage.
- Once clean, allow both the mop assembly and the mop to dry completely. Then, reattach the assembly before using it again.
- Remove the mop assembly (Image 6).
- Open the mid-range cover and take out the mid-range rotating brush (Image 7).
- Remove any waste or hair on the mid-range rotating brush with a bird brush (Image 8).
- Take out the side brush and remove any hair on it (Image 9).
- Remove any dirt or hair on the drive wheel with a bird brush.
- Remove any dirt or hair on the omnidirectional wheel with a bird brush.
- A hand holding a brush and a vacuum cleaner.
- It is important to regularly clean the sensors of the robot. Use a dry cloth or bird brush to remove any dust on them (Image 10).
- Additionally, clean the charging contacts of the robot on a regular basis, but avoid using a wet cloth as this could cause damage. Use a dry cloth or bird brush to remove any dust on the charging contacts (Image 11).
- To begin, drain the dirty water from the tank by opening the cover lid (Images 12 and 13).
- Next, open the clean water cover lid and place the tank under the faucet to add clean water. It's important to monitor the water level inside the tank while adding clean water to prevent overfilling (Image 14).
- If you need to clean the water tank, release the side latches and take out the clean water tank. After removing it, use a cloth or rinse it with clean water to remove any dirt. Avoid scrubbing the tank vigorously with a brush as it may cause damage and impact proper use (Images 15 and 16).
- To clean the docking station ramp, lift the round buckles on both sides and disassemble it. After cleaning, press the ramp down to reassemble it.
- Remove the cleaning rib from the docking station, and rinse it to remove mud and dirt.
Play Pause
Auto-Empty Station
For models XU7100, XU3100 and XU3110, which come with the Auto Empty station, when the dust bag is full you can remove the old dust bag and place a new one in the Auto-Empty station.
Depending on the model, watch our video on how to maintain your robot below.
If the solutions above did not help solve the issue, contact us for further assistance.
Depending on the model, watch our video on how to maintain your robot below.
If the solutions above did not help solve the issue, contact us for further assistance.
Play Pause